


What is HAProxy?
HAProxy is a popular open-source load balancer and reverse proxy software. It is widely used to distribute incoming network traffic across multiple servers and to improve the availability and scalability of systems. Configuring HAProxy can be a time-consuming and error-prone task, especially when done manually, this is the reason why many organizations use Ansible to configure HAProxy.
What is Ansible?
Ansible is an open-source automation tool that can be used to automate the deployment and configuration of software on remote servers. It uses simple YAML-based syntax to define automation tasks, which can be executed on one or more servers. Ansible is a powerful tool for automating the configuration of HAProxy.
So let's start our practical
You need to have Ansible installed on your system. You can install it using the package manager of your operating system. Once installed, you will need to create an inventory file that defines the servers on which you want to run the Ansible playbook and this can be done using the dynamic inventory feature of Ansible. Dynamic inventory allows you to define a script that generates the inventory file based on the current state of the system.
Here is our dynamic inventory
plugin: aws_ec2
regions:
        - ap-south-1
keyed_groups:
        - key: tags.worker
          seprator: ''
        - key: tags.Name
          seprator: ''
This dynamic inventory file will detect nodes running on AWS and group them according to their tags, so there will be two groups one "master" on which HAProxy will be configured and another "slave" on which our web server will be running.

Once you have the inventory file in place, you can create the Ansible playbook. The playbook is a YAML file that contains a list of tasks that Ansible will execute on the servers defined in the inventory file. In this case, we will create a playbook that configures HAProxy and Apache web servers on AWS instances.
# Hosts under "_slave" group will be configured as web servers
- hosts: _slave
  become: true
  tasks:
          - name: "install httpd software"
            package:
                    name: "httpd"
                    state: present
          - name: "install php software"
            package:
                    name: "php"
          - copy:
                  dest: "/var/www/html/index.php"
                  src: "index.php"
          - service:
                  name: "httpd"
                  state: restarted
# Hosts under "_master" group will be configured as HAProxy server.
- hosts: _master
  become: true
  tasks:
          - name: "install LoadBalancer Sofware"
            package:
                    name: "haproxy"
          - template:
                  dest: "/etc/haproxy/haproxy.cfg"
                  src: "haproxy.cfg"
          - service:
                  name: "haproxy"
                  state: restarted
To update the HAProxy Configuration file automatically each time a new Managed Node(Configured with Apache Webserver) joins the inventory.
backend app
    balance     roundrobin
{% for i in groups['_slave'] %}
    server  app{{ loop.index }}  {{ i }}:80 check
{% endfor %}
Before running the ansible-playbook first configure Aws credentials on your local system.
$ export AWS_REGION: <YOUR-AWS-REGION-NAME-HERE>
$ export AWS_ACCESS_KEY_ID: <YOUR-AWS-ACCESS-KEY-HERE>
$ export AWS_SECRET_ACCESS_KEY: <YOUR-AWS-SECRET-KEY-HERE>
# Make your aws private key executable
$ chmod 400 <private_key_name>
Now let's run our ansible playbook.
$ ansible-playbook lb.yml --private-key=/root/aws.pem -i aws_ec2.yml -u ec2-user
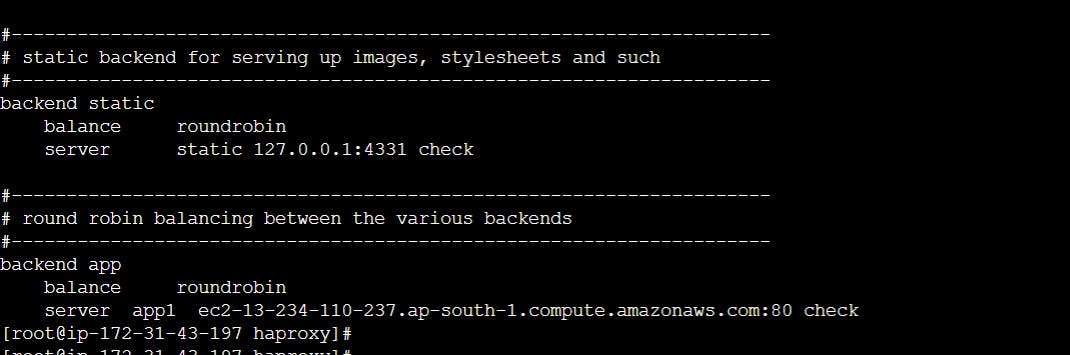
haproxy.cfg file is updated dynamically in the master node and you can confirm it by seeing the public DNS of the worker node.
Now let's check our HAProxy server.

As you can see our HAProxy server is working fine.
Now if the load increases and a new worker node comes up, we have to run this cmd "ansible-playbook lb.yml --private-key=/root/aws.pem -i aws_ec2.yml -u ec2-user" and all things will happen automatically.
Thanks for reading.